Tuesday, February 10, 2015

STRAWBERRY CHEESECAKE SO GOOD

STRAWBERRY

+CHEESECAKE+SO+GOOD
INGREDIENTS:
1 (8-oz.) package cream cheese, at room temperature
1/4 cup sour cream
1 Tablespoon plus 1/4 cup sugar, pided
1 teaspoon vanilla extract
1/2 teaspoon fresh lemon zest
6 (8-inch) soft flour tortillas
1 3/4 cups sliced strawberries, pided
1 Tablespoon cinnamon
Vegetable oil, for frying
Equipment: toothpicks; deep-fry thermometer

STRAWBERRY+CHEESECAKE+SO+GOOD


DIRECTIONS:
In the bowl of a stand mixer fitted with the paddle attachment, beat the cream cheese with the sour cream, 1 tablespoon sugar, vanilla extract and lemon zest, scraping down the sides of the bowl as needed. Fold in 3/4 cup of the sliced strawberries.
pide the mixture evenly between the tortillas, slathering each portion in the lower third of each tortilla. Next, fold the two sides of each tortilla toward the center and then roll the tortilla up like a burrito and secure it with a toothpick. Repeat the rolling process with the remaining tortillas.
Combine the remaining 1/4 cup sugar with the cinnamon in a shallow bowl and set it aside. Line a large plate with paper towels.
Add 3 inches of oil to a large, deep saucepan, leaving a minimum of 2 inches from the top of the oil to the top of the saucepan. Heat the oil over medium-high heat until it reaches 360ºF on a deep- fry thermometer.
Working in batches, fry the chimichangas until golden brown and crispy, about 3 minutes, flipping them as needed. Transfer the chimichangas to the paper towel-lined plate to drain for 1 minute, and then roll them in the cinnamon and sugar mixture. Repeat the frying and rolling process with the remaining chimichangas, returning the oil to 360ºF between batches.
Remove all toothpicks from the chimichangas and transfer them to serving plates. Top each with a portion of the remaining 1 cup of sliced strawberries and serve immediately.
Enjoy!!!

Masquerade Mask with Crepe Paper Flowers- Tutorial

we love this diy tutorial on making a crepe paper flower mask for mardi gras!
Disguise your eyes behind a beautiful royal purple mask for Mardi Gras or a New Years party. This tutorial shows you how to decorate a basic mask with handmade crepe paper flowers. Decorating your own mask is an easy way to customize a mask for an event and to get in some craft time for those craftaholics out there.

We decided to embellish a basic paper mache mask with purple crepe paper rosettes for an elegant and ornate mask, at a budget-friendly price. Purple ostrich feathers are an optional addition.


For this mask, you need:
(1) Basic Paper Mache Eye Mask in Black (only $2!)
(1) Purple Crepe Streamer
Glue (Hot Glue Gun, Craft Glue or Skillet Glue)
Scissors


Optional: (2) Purple Ostrich Feathers

These supplies are available at MardiGrasOutlet.com.


STEP 1
Cut about 25 strips of the crepe streamer that range from 10" to 15" long. Don't worry about making each length exact; it is actually easier later on to have rosettes that are smaller and bigger in size. Fold each strip in half lengthwise.


STEP 2
To form a paper flower, start rolling a paper strip at one end, pinching the folded side as shown. As you continue rolling, twist the crepe paper every few turns. Also, add a dab of glue as you are rolling to keep the rosette together. When you have finished twisting, cover the bottom with glue. You need about 25 to cover the mask.


STEP 3
Now you can glue the rosettes to the mask. This basic paper mache mask comes painted black, so that the mask base doesn't show through the edges. If you have a white mask, apply dark purple or black acrylic paint.


To cover the mask, start at one corner and work your way across the mask. Apply glue to the bottom of each rosette. Pick and choose the smaller or larger rosettes so that they fit together snugly.

OPTIONAL
Glue and poke two purple ostrich feather through and around the rosettes at the corner. The feathers should lean up and to the right.

You're finished! You can also try this in different crepe paper colors; just make sure the feathers coordinate with the mask.

This mask can also be used for table decor, centerpieces and other decorations.

Enjoy!

Crowd Pleasers

Party Recipes : sausage and peppers, baked mostacioli, grilled chicken, Mediterranean salad, zucchini
Are you hosting any parties this summer?  Here’s a few idea’s to help you feed the masses! Perfect for Father’s Day coming up this Sunday, a casual buffet or a backyard barbecue.
My family always enjoys a big pan of sausage with peppers and onions.
I buy my favorite Italian sausage and cook it up on the grill, because, lets be honest, grilled sausage has the best flavor!
When it cools down I slice it into two inch pieces on the diagonal.
 Five pounds will feed a ton of people!


For flavor and convenience I always roast my peppers and onions on a baking sheet drizzled and tossed in olive oil and seasoned with salt and pepper in a hot 425 degree oven, this way you can do large amounts and your stove doesn’t get all messy and splattered with grease, and personally, I think the flavor is so much better!
You can make this ahead of time, toss everything in a foil pan and heat it up right on the grill when you’re ready to eat for a few minutes just until warm.
Chickens marinated ahead of time in olive oil, garlic, lemon juice and lemon peel tossed with parsley, oregano or any of your favorite herbs. I like buying half chickens and then after they’re grilled I just cut them across the center to separate the leg and thigh and wing and breast.
 Five chickens will yield you twenty quarter pieces.

Everybody loves a pan of Baked Mostaccioli and it compliments the chicken and the sausage so well! 2 pounds of pasta goes a very long way especially when you are adding ricotta, grated romano cheese and fresh mozzarella to it.
I always like to have some vegetable sides like this pan of zucchini that I roasted with a little bit of olive oil in a 425 degree oven with thin sliced tomatoes and onions.
 When it all cools down, drizzle all over with more olive oil and fresh basil, you can eat this at room temperature.
Try to find and use the smaller zucchini for inpidual servings or you can just cut them in half.
Eggplant caprese stacks are a wonderful side dish, honestly they’re so good you’ll see them disappear quickly!
You can prepare the eggplant the day before or early in the day, slicing into rounds then breading and frying until crispy, then all you have to do is layer one slice of eggplant caprese style with a ripe tomato slice, fresh mozzarella and a basil leaf, then drizzle all over with olive oil. 
Place this mediterranean salad on a big platter and everyone will dig in! Tomato wedges, sliced fennel, red pepper strips, kalamata olives, red onion, crumbled feta cheese and drained canned cannellini beans, all tossed together with parsley, basil, lemon juice and olive oil, also delicious at room temperature.
And don’t forget nice crusty Italian bread to either make a small sausage sandwich or just to have it on the side.
Party on!

PERFECT SUGAR COOKIE CUT-OUTS

The BEST recipe I've ever found for Sugar Cookie Cut-outs! This easy method makes the most moist, tender, delicious cookies that you can decorate however you like!
Even though the holidays get super busy for us, there is one thing I ALWAYS make time for… Homemade Sugar Cookies! I remember making them with my Mom every year when I was little, and it’s something I really look forward to each year with my kiddos too. There is one recipe that I’ve found makes the PERFECT Sugar Cookie Cut-outs every time, and I couldn’t let this Christmas go by without sharing it with you! If you’re planning on making cookies for the holidays, you definitely need to give this recipe a try!
The BEST recipe I've ever found for Sugar Cookie Cut-outs!
There’s something I think you guys need to know about me… I’m fairly confident I can cook just about anything you throw my way, but baking… that a whole other story! Once I moved out of my Mom’s house, I learned real quick that I’m not the world’s best baker. I tried baking my son’s first birthday cake with fancy fondant decorations and needed my little sister to help me finish it minutes before the party started. I’ve managed to ruin more batches of cookies than I can count and hatemessing with melted chocolate desserts. I can bake… but I just can’t deal with “fussy” baking. Do you know what I mean?
The BEST Sugar Cookie Cut-out recipe!
I’ve learned over the years the type of desserts that I can tackle and the ones that are better left to the pros, so I want you to know that when I share a dessert recipe with you… It’s one you can DEFINITELY do! These sugar cookies are the PERFECT example of that! My past attempts at sugar cookies were pretty miserable, and I nearly gave up and bought a package of store-bought cookie dough to save me the angst. But then I discovered the secret to making perfect, easy sugar cookie cut-outs, and it’s something I look forward to baking every year!
The BEST Sugar Cookie Cut-out recipe!
I know the basic recipe for sugar cookies is pretty universal across the board, but there’s a few things that set mine apart. First, almond extract. Vanilla is a must when you’re making sugar cookie dough, but the addition of a little almond extract gives the cookies a unique flavor that I just love. So good!
The BEST Sugar Cookie Cut-out recipe!
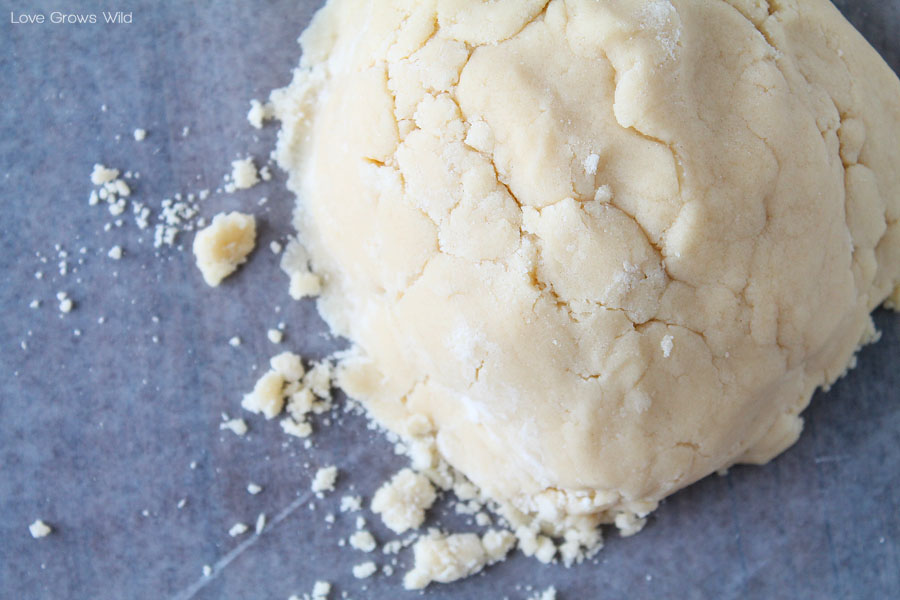
The second thing that sets this recipe apart is the method for cutting out the cookies. Normally, you make the dough, put it in the refrigerator to chill, roll it out, and cut it with cookie cutters. But for whatever reason, I can NEVER get this process to go right! The dough sticks to the rolling pin, I can’t get the dough out of the cookie cutters, and I end up an angry, frustrated mess of flour and dough. Not fun!
The BEST Sugar Cookie Cut-out recipe!
So do you want to know the secret to making the perfect cookie cut-outs? It’s so easy! Once you make the dough, roll it out BEFORE chilling it in the refrigerator between two sheets of parchment or wax paper. The parchment protects it from sticking to anything, so there’s no need to add extra flour. AND you don’t have to wrestle with the dough after it’s already been chilled! Just pull it out of the fridge, and you can cut perfect shapes with your cookie cutters! Another bonus of this method, the dough only needs to chill for about 20-30 minutes since it’s rolled out instead of in a big ball of dough. I cannot tell you how much I LOVE this method of making sugar cookies! Oh, one more thing: make sure to only let your cookies cool about 5 minutes on the baking sheet before transferring to a cooling rack to finish cooling. That way they won’t overcook and will stay nice and tender. It really does make a difference!
The BEST Sugar Cookie Cut-out recipe!
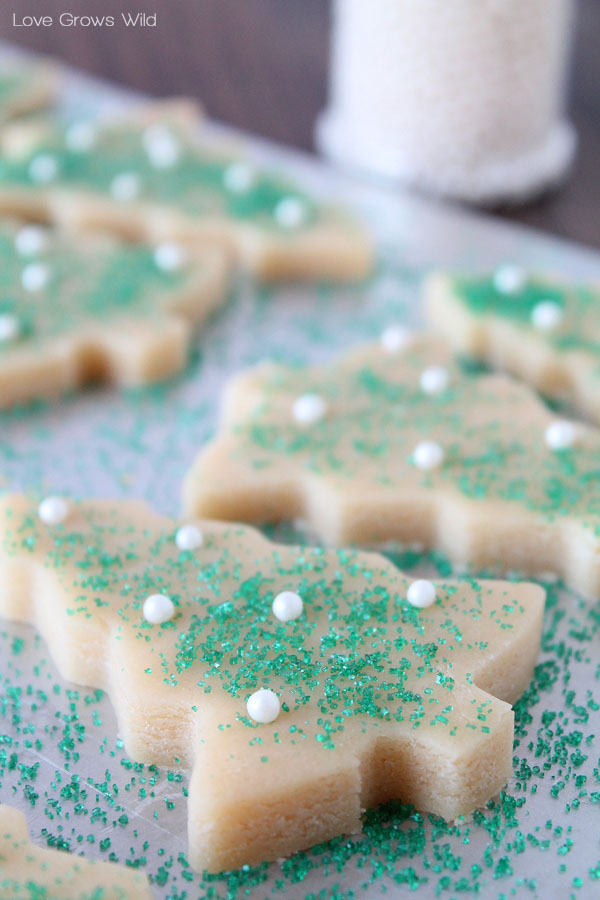
I like to decorate my cookies very simply with colored sugars (remember, I don’t do fussy baking!), but you can decorate with icing or whatever your heart desires! One bite of these incredible cookies and you will never make them any other way again! They are perfectly tender with just the right amount of sugar. I just love the texture of the cookies! I cannot say enough about how perfect these cookies are, so you’ll just have to try them yourself! Promise me you will try them this Christmas! P.S. Santa will LOVE them too! :)
The BEST Sugar Cookie Cut-out recipe!

Perfect Sugar Cookie Cut-outs

Prep time
25 mins


Cook time
10 mins


Total time
35 mins


This recipe makes the PERFECT Sugar Cookie Cut-outs! The cookies turn out so tender and delicious using this easy method!

Author: 
Recipe type: Dessert
Serves: 40-50 cookies


Ingredients
  • 1 cup unsalted butter, room temperature
  • 1¼ cup sugar
  • 1 egg
  • 1½ teaspoons vanilla extract
  • ½ teaspoon almond extract
  • 3 cups of flour
  • 1½ teaspoons baking powder
  • ¼ teaspoon salt
  • colored sugars for decorating


Instructions
  1. In a large mixing bowl, cream together butter and sugar until light and fluffy, about 2 minutes. Add in egg, vanilla extract, and almond extract and mix until combined.
  2. In a separate bowl, combine flour, baking powder, and salt. Make sure to spoon the flour into your measuring cup and level it off with a knife to ensure accurate measurements. Slowly add the flour mixture to the butter mixture and mix until completely combined.
  3. Roll the dough between 2 sheets of parchment or wax paper and place on a baking sheet in the refrigerator. Chill for about 20-30 minutes.
  4. Cut dough into shapes with cookie cutters and transfer to a baking sheet. Sprinkle with colored sugars and bake at 350 degrees for 8-12 minutes. Cool on baking sheet 5 minutes, then transfer to a baking rack to cool completely. Store in an airtight container. Makes about 40-50 cookies.


Notes
For this recipe, the dough only needs to chill about 20-30 minutes in the refrigerator since it is already rolled out. If you would rather chill the dough first before rolling, you'll want to increase the chill time to about an hour.

Using the parchment paper is a great tip for rolling the dough, because it eliminates the need to add extra flour to keep it from sticking.

My cookies were done baking in 9 minutes, but check yours closely. You want them to be just barely set and not yet browned. They'll seem slightly undercooked right out of the oven, but will firm up nicely once cooled. 9 minutes seemed to be the sweet spot for me!

Once the cookies come out of the oven, only let them stay on the baking sheet for about 5 minutes, or just until you're able to carefully slide a spatula underneath the cookies without breaking them to transfer to a cooling rack. Letting the cookies stay on the baking sheet any longer will dry them out, making them less soft and tender.

SIMPLE ORE IDA HASH BROWN CUPS

Simple Hash Brown Cups - make in just a few minutes and fill with anything you want (chili, broccoli and cheese, etc.).
I love potatoes, like order a baked potato with a side of french fries for dinner love potatoes. That means I typically eat my potatoes as soon as I buy them and don’t have any fresh ones when I’m craving them, which is pretty much all the time. Last week I was craving potatoes but didn’t have any on hand so I decided to make these hash brown cups from the Ore Ida Frozen Hash Browns that I picked up at Walmart last week.
Diced hash browns #OreIdaHashbrn #shop #cbias
The hash brown cups were so simple to make and were fantastic topped with chili and cheese for dinner one night and broccoli, cheese, and bacon for lunch the next day. They would also be a great idea for holiday entertaining because they look fancier than french fries or a baked potato and taste just as good.
Chili cheese hash brown cups #OreIdaHashbrn #shop #cbias
Make Your Own
Step 1 – Gather your supplies. This should be easy because there aren’t too many of them. Once you have your supplies, thaw your hash browns. You can either do that overnight in the fridge or you can run the frozen hash browns under hot water quickly to thaw. I did the latter.
Hash brown cup supplies #OreIdaHashbrn #shop #cbias
Step 2 – Mix your thawed hash browns, olive oil, egg, cheese, salt, and pepper together in a large bowl until well combined.
Hash brown cups mixture  #OreIdaHashbrn #shop #cbias
Step 3 – Spray each cup of a muffin tin generously with a baking spray then fill each cup about 3/4 full with the hash brown mixture.
Hash brown cups #OreIdaHashbrn #shop #cbias
Step 4 – Using your fingers, make a cavity in the middle of the hash browns by pressing the mixture up along the sides of the cup. Make sure that you leave some of the mixture on the bottom so it forms a nice cup shape.
Hash brown cups #OreIdaHashbrn #shop #cbias
Step 5 – Bake in the oven at 400 degrees for 45-55 minutes or until the edges are browned and crispy.
Hash brown cups #OreIdaHashbrn #shop #cbias
Step 6 – Let cool slightly then remove from the muffin pan by sliding a rubber spatula underneath.
Hash brown cups #OreIdaHashbrn #shop #cbias
And enjoy!
Simple hash brown cups by playpartypin.com  #OreIdaHashbrn #shop #cbias
I think I might make these again while I’m in Kansas visiting my family this week. My nephews LOVE potatoes and I think these would make a great dinner before we go see Disney’s Frozen together. Are you as excited about Frozen as I am? Ore Ida is and they’re celebrating with a great Disney’s Frozen sweepstakes where you could win a trip to Atlantis resort in the Bahamas or other great prizes.
Are you a potato lover like me and looking for creative ways to use Ore Ida hash browns? If so, you’re in luck because I’ve got three great resources for you. First, come join the Ore Ida hash brown twitter party on Wednesday, November 27th at 11EST using hashtag #OreIdaHashbrn, then go check out a great demo at a participating Walmart on November 30th or December 1st to see how they use Ore Ida hash browns. And if that’s still not enough, bloggers all over the country are using hash browns in creative ways and posting them to Pinterest. Check out this Pinterest board for other creative ideas.
 
Hash Brown Cups
Print this recipe
Ingredients:
(makes 12 cups)

  • 15 oz Ore Ida Frozen Shredded Hash Browns
  • 1/2 tsp salt
  • 1 egg, lightly beat
  • 1 T olive oil
  • 1/4 cup shredded Mexican blend or mild cheddar cheese
 Instructions:
  1. Preheat oven to 400 degrees F. 
  2. Spray each muffin tin generously with baking spray. 
  3. Mix all ingredients together until well combined. 
  4. Fill each baking cup about 3/4 of the way full with the potato mixture.
  5. Using your fingers, make a cavity in the middle of the potato mixture by pushing the potatoes to the sides of the muffin cups. Make sure you leave a layer on the bottom of the cup (so don’t make the cavity go all the way to the bottom).
  6. Bake at 400 degrees for 45-55 minutes, until the outside edge if browned and crispy and all potatoes are heated through.
  7. Let cool for a few minutes then slide hash brown cups out using a rubber spatula.
  8. Serve hot topped with your favorite toppings – chili, broccoli and cheese, etc.  
Simple Hash Brown Cups - make in just a few minutes and fill with anything you want (chili, broccoli and cheese, etc.).

Hash Brown Cups
Ingredients
  1. 15 oz Ore Ida Frozen Shredded Hash Browns
  2. 1/2 tsp salt
  3. 1 egg, lightly beat
  4. 1 T olive oil
  5. 1/4 cup shredded Mexican blend or mild cheddar cheese

Instructions
  1. Preheat oven to 400 degrees F.
  2. Spray each muffin tin generously with baking spray.
  3. Mix all ingredients together until well combined.
  4. Fill each baking cup about 3/4 of the way full with the potato mixture.
  5. Using your fingers, make a cavity in the middle of the potato mixture by pushing the potatoes to the sides of the muffin cups. Make sure you leave a layer on the bottom of the cup (so don't make the cavity go all the way to the bottom).
  6. Bake at 400 degrees for 45-55 minutes, until the outside edge if browned and crispy and all potatoes are heated through.
  7. Let cool for a few minutes then slide hash brown cups out using a rubber spatula.
  8. Serve hot topped with your favorite toppings - chili, broccoli and cheese, etc.

DIY Valentine’s Day Projects

52 Things I Love About You Book (made with playing cards)  - DIY Valentines Day Projects
I was looking for some fun DIY Valentine’s Day project I could make and here are a few of my favorites! Some of these can even be used year round (like the towel and the bookmark) and others you can modify to fit other holidays (like the Heart pin, candy jars) just by changing colors and maybe shapes. I hope you enjoy this list :)

Valentine’s Day Ruffled Tea Towel  - 10 DIY Valentine's Day Projects

Valentine’s Day Ruffled Tea Towel by CraftaholicsAnonymous.net

 DIY Heart Banner - 10 DIY Valentine's Day Projects

DIY Heart Banner (photo credit)


 DIY Heart Banner - 10 DIY Valentine's Day Projects

Be Mine Banner (photo credit)


52 Things I Love About You Book (made with playing cards) - 10 DIY Valentine's Day Projects

52 Things I Love About You Book (made with playing cards) onCraftster.Org


DIY Heart Shaped Paper Clips with note - 10 DIY Valentine's Day ProjectsDIY Heart Shaped Paper Clips with note - 10 DIY Valentine's Day Projects

DIY Heart Shaped Paper Clips with note onDesignSponge.com

 DIY Valentine Treat Box - 10 DIY Valentine's Day Projects

DIY Valentine Treat Box on StampWithSandy


 Valentine's Heart Pins - 10 DIY Valentine's Day Projects

Valentine’s Heart Pins on Purlbee.com


DIY Valentine's Day Wreath - 10 DIY Valentine's Day Projects

DIY Valentine’s Wreath on HooahandHiccups.com


DIY Valentine’s Day Candy Jars - 10 DIY Valentine's Day Projects

DIY Valentine’s Candy Jars on Momtastic.com


Love Juice DIY Valentine's  - 10 DIY Valentine's Day Projects

Love Juice DIY Valentine’s on AtSecondStreet

If you have any Valentine’s Day DIY projects you would to share please leave a link in the comments. I am always looking for something fun to do with my kids.