Thursday, January 29, 2015

55 Must-Read Cleaning Tips & Tricks

I’ve been cleaning for as long as I can remember, but apparently I’ve been doing a lot of things wrong! Or, the hard way, I should say. And it’s not always necessary to buy the expensive bottled stuff to get your home clean, not when things like baking soda, peroxide and vinegar actually do a better job. Although, I can’t seem to break my habit of the Mr. Clean Gain scented cleaner. Who can resist the smell of fresh laundry in every room?
Spring is right around the corner, and I figure it’s as good of a time as any to get started with the annual deep cleaning. Things like my lent traps, ceiling fans, and other places in the home that get forgotten about. I like to break it up so I don’t get overwhelmed – tackle just a few things a week. I’ve compiled a list of household cleaning tips and tricks from around the web that I really found useful! Some of these are just plain genius.
1. Sanitizing Sponges
I kind of get grossed out by sponges. Do you? I just feel like they are perfect for harboring millions of germs. I do like the sponges with the rough side for scrubbing out hard-to-clean pots and pans, but end up throwing them out before their life cycle is over. What a waste! Instead, put them in the microwave for a couple of minutes and watch as the microbes sizzle away.
55 Must-Read Cleaning Tips & Tricks
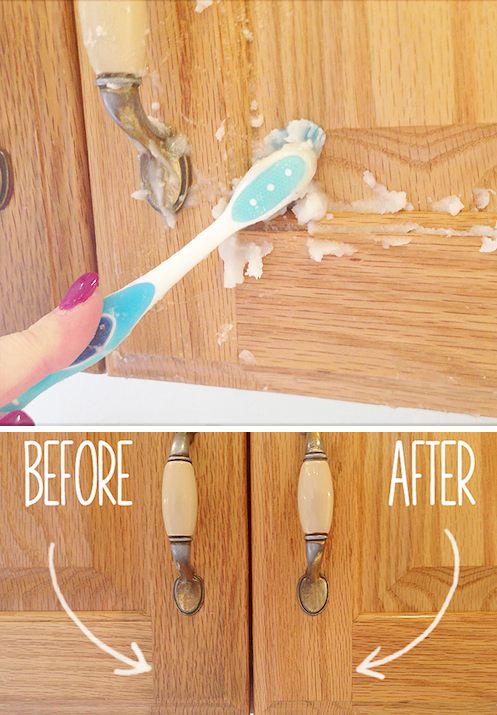
2. Kitchen Cabinet Gunk Remover
Have you taken a close look at your cabinet doors lately, especially around the handles? You’d be surprised at how much gunk can accumulate over time. To be honest, I’m not sure that I’ve ever given my cabinet doors a good scrub. Yikes! This cabinet cleaner only requires 2 ingredients, and you probably already have them right in the cabinet that needs to be cleaned.55 Must-Read Cleaning Tips & Tricks
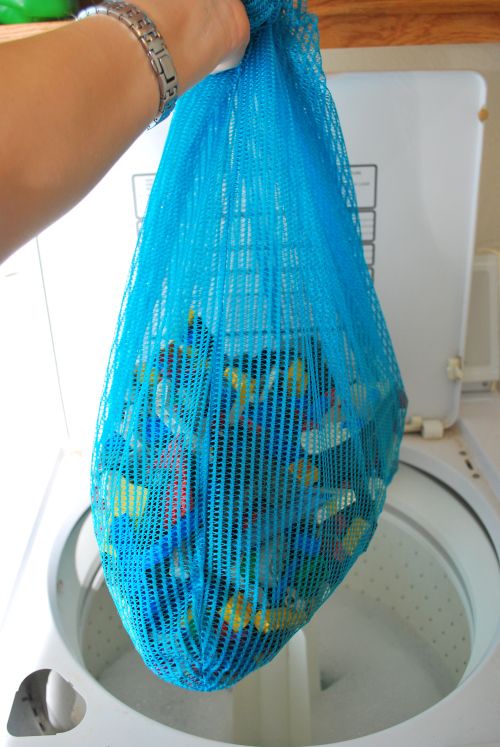
3. Clean Small Toys In A Laundry Bag
I’ve never thought to wash anything in my washing machine other than clothes, but I suppose a laundry bag can make it possible to clean so much more, including small lego pieces! You could also use this concept in the dishwasher.
55 Must-Read Cleaning Tips & Tricks
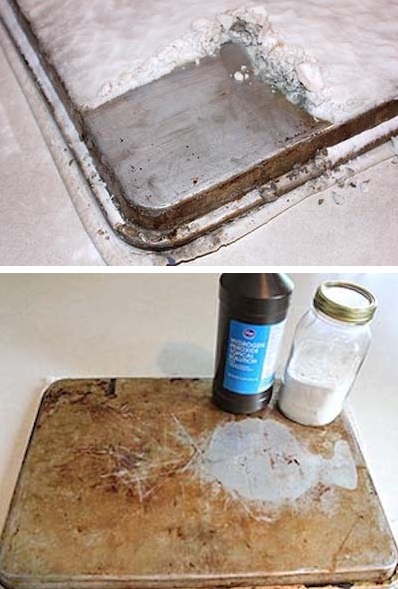
4. Cookie Sheet Miracle Cleaner
I actually have a few cookie sheets that look just like that – gross! They seem to rust and get grimy really fast. I just cover them with foil before doing any actual baking. Time for a cleaning? I think so. Not only does this cookie sheet miracle cleaner only require two ingredients, but there’s also no scrubbing required! Just let it sit and do it’s job while you tackle other things.
55 Must-Read Cleaning Tips & Tricks
5. Clean Fan Blades With A Pillow Case
If you’re anything like me, you have about a dozen extra pillow cases laying around in a spare closet. Wait, is that just me? Use one to slide onto the blades of your ceiling fans, and then wipe the blades off inside the case. No more dust in your face! So quick and easy, too.
55 Must-Read Cleaning Tips & Tricks


6. Cleaning Between Oven Glass
Bet you didn’t know you could go there, did ya? I didn’t! That double paned window on your oven somehow manages to collect grime over time, and it would seem impossible to even attempt to clean it, but it’s easier than you might think! Especially if you already happen to have a wire hanger, Windex wipes, and a few rubber bands handy.
55 Must-Read Cleaning Tips & Tricks

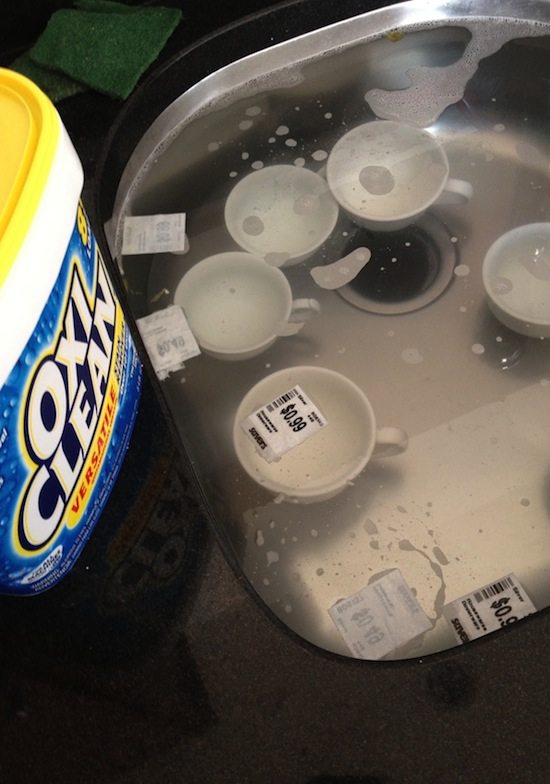
7. Removing Labels In A Flash
Why must ceramic manufacturers use the stickiest labels they can possibly find? WHY? I recently encountered this problem after I replaced all of my old dinnerware, and then spent 30 minutes trying (trying!) to remove the labels. Next time, I’ll remove them the easy way with Oxi-Clean! Wish I had know this years ago.
55 Must-Read Cleaning Tips & Tricks

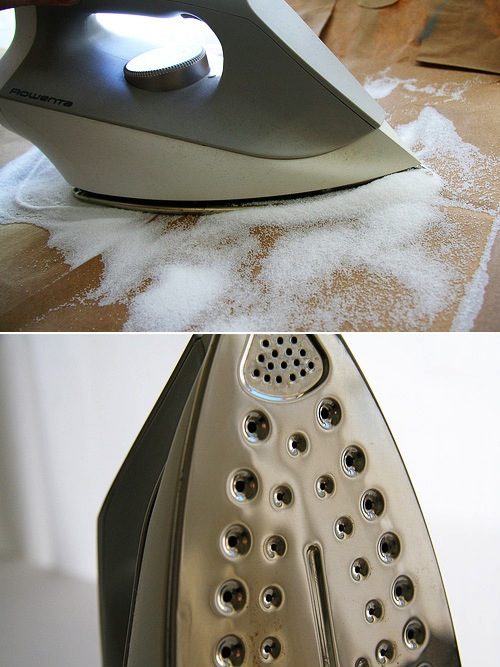
8. Use Salt To Clean Your Iron

Salt? Yep! Pour salt on your ironing board (Perhaps cover with a pillow case or something to make clean up easier), and then iron the salt with the steam option off. The dirt on your iron will stick to the salt, making for an easy clean!
55 Must-Read Cleaning Tips & Tricks
9. Squeegee Hair Picker Upper


A new use for an old item! Turns out your squeegee has a brilliant use other than getting your windows squeaky clean. Use one as a quick and easy way to wipe pet hair off of your carpets and rugs.
55 Must-Read Cleaning Tips & Tricks


27. Removing Hard Water Stains


…the natural way! Hard to believe that a lemon can be so powerful. Not only that, but you don’t have to deal with that harsh chemical smell, only the scent of fresh lemons! This is a heck of a lot cheaper, too!
55 Must-Read Cleaning Tips & Tricks


7-INGREDIENT TUSCAN WHITE BEAN SOUP

7-Ingredient Tuscan White Bean Soup | gimmesomeoven.com
Yes, I threw in the word “Tuscan”.  It has a way of making everything sound a bit more lovely, doesn’t it?
Actually, I realized this month that it was exactly half a year ago that my sister and I were in Tuscany.  In some ways it feels like ages go.  Yet as usually the case with Italy, the memory of it all can come flooding back to me in a heartbeat.  The feel of the cobblestones under our feet, the pillowy softness of the homemade gnocchi, the flourish of everyone’s accents, the laughter and music ringing through the narrow streets, the smoothness of the wine, the respectfulness to generations of art, the creaminess of the gelato, the simplicity of it all.
Oh, Italy.  There are a million reasons to love it, each of them worthy.  But this past summer, I think it was the simplicity of the place was what made me love it all the more.  Because it takes a certain kind of confidence in life to keep things simple, to trust the goodness and beauty when it’s found, and not cave to the pressure to add and garnish and modernize and keep accumulating more, more, more.  Italy does simplicity well.  And it does simplicity deliciously, especially when it comes to food like white bean soup that was inspired by one I enjoyed in a cafe on the streets of Florence.

7-Ingredient Tuscan White Bean Soup | gimmesomeoven.com
As a recipe developer, one of the things I always can’t help but notice about good Italian food is how simplethe ingredients often are.  While I’m one who’s often tempted to finish off a recipe by adding a little bit of this, and a little bit of that…and then a little bit more of this and that…I feel like I’ve learned a lot from Italian cooking over the years about trusting the main ingredients to stand on their own.
The key, of course, is to be sure to invest in good-quality ingredients so that you can rely on them.  But in a soup like this with just 7 ingredients, that’s actually pretty easy to do.
7-Ingredient Tuscan White Bean Soup | gimmesomeoven.com
All you need is some good-quality chicken stock, your favorite pancetta (or bacon), white beans (I went the extra “simple” way and used canned beans), fresh garlic, fresh rosemary, and some onion and a bay leaf to help season the soup.  And then I highly recommend some freshly-grated Parmesan and rustic bread to go with it.
And about 30-40 minutes later, this delicious, flavorful, and oh-so-comforting soup will be ready to go.
It’s simplicity at its best.  And I would say, most delicious.
Mmmm.  Enjoy.
7-Ingredient Tuscan White Bean Soup | gimmesomeoven.com
YIELD: 6-8 SERVINGS

7-INGREDIENT TUSCAN WHITE BEAN SOUP


This 7-Ingredient Tuscan White Bean Soup is simple, hearty, surprisingly flavorful. It's the perfect winter comfort food.

PREP:  10 MINS COOK:  30 MINS TOTAL:  40 MINS

INGREDIENTS:


  • 4 ounces pancetta or bacon, finely diced
  • 1 small white onion, peeled and diced
  • 5 cloves garlic, peeled and minced
  • 8 cups good-quality chicken stock
  • 4 (15-ounce) cans cannellini beans, rinsed and drained
  • 1 bay leaf
  • 1 large sprig fresh rosemary
  • salt and freshly-ground black pepper
  • (optional but highly recommended for serving: freshly-grated Parmesan, Italian bread)

DIRECTIONS:


  1. Heat pancetta (or bacon) in a large stockpot over medium-high heat.  Cook until crispy, stirring occasionally.  Transfer the bacon to a separate plate, using a slotted spoon, reserving about 3 tablespoons of bacon grease in the stockpot.  (Discard any extra grease, or you can substitute olive oil in place of the 3 tablespoons of bacon grease.)
  2. Add onion and cook for 5 minutes, stirring occasionally, until soft and translucent.  Add garlic and cook for 1-2 minutes until fragrant, stirring occasionally.
  3. Add chicken stock, beans, bay leaf, rosemary and half of the cooked pancetta (or bacon).  Stir to combine.  Continue cooking the soup until it reaches a simmer.  Then reduce heat to medium-low, cover partially, and let the soup simmer for 10-20 minutes so that the flavors will meld.
  4. Add salt and pepper to taste.  (I definitely recommend a generous pinch or two of black pepper, and extra salt if needed, depending on your chicken stock.)  Remove the bay leaf and rosemary.
  5. Serve warm, topped with the extra pancetta (or bacon).  Garnish with Parmesan and serve with Italian bread if desired.

DIFFICULTY: EASY CATEGORY: QUICK
7-Ingredient Tuscan White Bean Soup | gimmesomeoven.com

SLOPPY JOE TACOS

Sloppy Joe Tacos | gimmesomeoven.com
At the time this post goes live, pretty sure that life will find me laying out on the beach in Mexico, with four girlfriends by my side, a pina colada in hand, no computer in sight, listening to the waves, soaking up some much-needed sunshine, talking for hours and hours and beyond, and basically doing absolutely nothing.
Ah, vacation.  I’ve been looking forward to you for a long time.
So while I’m down there livin’ the dream of eating Mexican food morning, noon and night, I thought I would leave behind a Mexican recipe to share with you on the blog today.  I have admitted before that ground beef isn’t my thing, so this one goes out to my dad and all of you out there who happen to love ground beef, and specifically — sloppy joes!  Yep, I made ‘em into tacos.  Because if you ask me, that delicious saucy filling was made to go in taco shells.
And not just any shells…

Sloppy Joe Tacos | gimmesomeoven.com
As part of my partnership working with Old El Paso this year to come up with some fresh and tasty new Mexican dishes, they asked us to share with you the good news about a new product that recently hit the shelves — their Bold Nacho Cheese Taco Shells!!
I tried to line ‘em up next to Old El Paso’s traditional Stand ‘n’ Stuff Corn Tortilla shells so that you could see the difference.  And oh baby, those shells were positively glowing when the sun was shining behind them in these photos.  The nacho shells are the darker ones, and they are packed with nacho cheese flavor and are suuuper popular right now.  Because, well, who doesn’t love that classic nacho flavoring?
Whatever kind of shells you choose, though, I promise that this sloppy joe filling will make them all the more delicious.
Sloppy Joe Tacos | gimmesomeoven.com
So to make these tacos, whip up a batch of sloppy joe ground beef filling from scratch.  No need to buy the canned stuff.  This filling is super easy to make from scratch!Sloppy Joe Tacos | gimmesomeoven.com
Then, pop it in your taco shell…
Sloppy Joe Tacos | gimmesomeoven.com
…ok, make that a lot of shells…
Sloppy Joe Tacos | gimmesomeoven.com
…and top your tacos with whatever fillings sound good.  I was cleaning out the fridge before taking off on vacation, so I just went with a simple cheese and cilantro topping.  But avocado, sliced radishes, diced avocado, diced tomato, sour cream — you know — anything and everything would be good.
Hope you enjoy the ground beef in my absence.  And hasta la vista, bebe — I’ll be back soon!  :)

SLOPPY JOE TACOS


All of the goodness of traditional sloppy joes -- turned into tacos!

PREP:  5 MINS COOK:  20 MINS TOTAL:  25 MINS

INGREDIENTS:


  • 1 tablespoon olive oil
  • 1 pound lean ground beef
  • 1 small yellow onion, peeled and diced
  • 1 small red bell pepper, cored and diced
  • 2 cloves garlic, minced
  • 2 cups tomato sauce
  • 2 tablespoons packed brown sugar
  • 1 tablespoon worcestershire sauce
  • 1 teaspoon chili powder
  • pinch of salt and pepper, to taste
  • Old El Paso Stand 'n' Stuff Taco Shells (Traditional Corn or Nacho Cheese)
  • optional toppings: shredded Mexican cheese, chopped fresh cilantro, sour cream, diced avocado, etc.

DIRECTIONS:


Heat oil in a large saute pan over medium-high heat.  Add ground beef and cook until browned, breaking up the beef with a spoon and stirring occasionally.  Drain off any excess fat and discard it.
Return pan to the heat, and add the onion, red bell pepper and garlic to the ground beef.  Continue sauteing for about 5 minutes, or until the onion is soft and translucent, stirring occasionally.
While the veggies are sauteing, whisk together the tomato sauce, brown sugar, worcestershire, and chili powder until combined.  Once the veggies are cooked, add the tomato sauce mixture to the ground beef and stir until combined.  Continue cooking until the mixture reaches a simmer, then reduce heat to medium-low and simmer for 5 minutes.  Season with salt and pepper, then remove from heat.
To assemble the tacos, place the ground beef filling in the taco shells and top with your desired toppings.  Serve immediately.

DIFFICULTY: EASY CATEGORY: QUICK

Wednesday, January 28, 2015

5-INGREDIENT STRAWBERRY CAPRESE PASTA SALAD

This Strawberry Caprese Pasta Salad is made simple with just five ingredients, and tossed in a delicious balsamic reduction.
5 Ingredient Strawberry Caprese Pasta Salad | gimmesomeoven.com #easy #recipe #vegetarian
I feel like I should forewarn you that this may turn into the Summer Of Pasta Salads here on the blog.
I am apparently obsessed with them lately, especially once the lightbulb went off and I realized (far too late in life) that the words pasta salad do not need to be linked with mayonnaise.
Ugh.
I keep trying to be an adult and learn to like mayo.  But it is just not my thing.
This came up in conversation twice in the last month with friends and everyone was discussing what foods they still no longer like as an adult.  I was aghast when some close friends proudly declared that they don’t like shrimp (ah!), mushrooms (yum!), and soft cheese (MY LIFE).  But when it was my turn and I confessed that I don’t like mayo, it was my turn to hear all of the gasps.  Eh, everyone substitutes Greek yogurt for it nowadays anyway, right??
Well, this pasta salad has mayo nowhere in sight.  And when I posted it on Instagram last week, everyone still seemed pretty excited about it.  So let’s get to it!

5 Ingredient Strawberry Caprese Pasta Salad | gimmesomeoven.com #easy #recipe #vegetarian
Clearly I’m also still on the 5-ingredient bandwagon lately.  It’s too fun of a challenge to pass up!  And I have to say that I think this recipe maximizes the heck out of all five.
I couldn’t decide whether to call it Strawberry Balsamic Pasta Salad or Strawberry Caprese Pasta Salad.  But basically it’s a “caprese” recipe where you substitute in strawberries for tomatoes.  So that makes the five ingredients:
  • pasta
  • fresh strawberries
  • fresh mozzarella
  • fresh basil
  • balsamic reduction
5 Ingredient Strawberry Caprese Pasta Salad | gimmesomeoven.com #easy #recipe #vegetarian
As you can see, I substituted in one of my favorite DeLallo products — their heavenly balsamic glaze — instead of reducing my own balsamic.  But you can also easily make it for yourself on the stove while your pasta water comes to a boil.
5 Ingredient Strawberry Caprese Pasta Salad | gimmesomeoven.com #easy #recipe #vegetarian
And the process itself is simple.  Just cook your noodles, then drain and immediately rinse them in cold water to halt the cooking.  Then toss the noodles with the berries, chopped basil and diced mozzarella.  And drizzle with as much reduced balsamic as you’d like.
5 Ingredient Strawberry Caprese Pasta Salad | gimmesomeoven.com #easy #recipe #vegetarian
I was initially going to toss the salad in the balsamic, and then my friend Maria suggested I just drizzle it instead.  That’s what good foodie friends are for — look how pretty it is!
Anyway, this is a stellar dish for any summer grill-out or tailgaiting or even just a lovely dinner inside at home.  And if you’re not feeling the chilled vibe, this pasta also works well served warm.  (Just know that your mozzarella will melt if tossed with hot pasta.)
And the best news?  NO MAYO IN SIGHT.  :)
Enjoy!
5 Ingredient Strawberry Caprese Pasta Salad | gimmesomeoven.com #easy #recipe #vegetarian


PRINT SAVE
YIELD: ABOUT 4-6 SERVINGS

5-INGREDIENT STRAWBERRY CAPRESE PASTA SALAD


This 5-Ingredient Strawberry Caprese Pasta Salad is quick and easy to make, and a delicious sweet and savory addition to any meal.

PREP:  5 MINS COOK:  10 MINS TOTAL:  15 MINS

INGREDIENTS:


  • 1 pound dry pasta (I used farfalle)
  • 1 pint fresh strawberries, hulled and halved
  • 1 ball fresh mozzarella, diced
  • 1/2 cup loosely packed torn fresh basil
  • 3 tablespoons balsamic glaze (I used DeLallo, but see instructions below for a homemade alternative)

DIRECTIONS:


Cook pasta in a large pot of salted boiling water al dente, according to package instructions. Drain and immediately rinse with cold water to stop the pasta from cooking.
Toss the pasta with the strawberries, mozzarella and basil. Pour half of the pasta into a serving bowl, and drizzle with balsamic glaze. Then pour the remaining half of the pasta on top, and drizzle with the balsamic glaze. Sprinkle with extra basil if desired. Also, if the pasta seems to dry, you can toss it with a tablespoon of olive oil.
*To make balsamic glaze homemade, whisk together 1/2 cup balsamic vinegar and 1 tablespoon of granulated sugar together in a small saucepan. Bring to a boil over medium high heat, then reduce heat to medium low and simmer for 10 minutes or until reduced by half. Give it a taste. If you think it needs sweetening, stir in a few teaspoons of sugar or honey.

SESAME CHICKEN WITH QUINOA

You will love this lighter Sesame Chicken with Quinoa recipe — just a simple saute served over flavorful quinoa.
Healthier Sesame Chicken Recipe | gimmesomeoven.com
I have learned this year that any sort of conferences or events that food bloggers attend are a pretty much guaranteed 24/7 gourmet food fest.  I’m totally not exaggerating.  I’m now about three days into my time in Chicago and already — I’m stuffed!!!  And there are still four full days to go!  :)
At least I can find a little comfort in the fact that I planned ahead this time and head a pretty healthy week of meals before I left Kansas City.  And this Sesame Chicken with Quinoawas definitely one of the highlights!  (And yes, that’s the quinioa from my How To Cook Quinoa post.  If you’re new to cooking this grain, be sure to check out the step-by-step tutorial for how to whip up a quick and easy batch!)

Healthier Sesame Chicken Recipe | gimmesomeoven.com
I know that people tend to go bonkers over a good sesame chicken dish.  I definitely love that sweet and sesame-y sauce.  But I have to be honest — the heavy deep-fried batter has never really been my thing.
So for a “lighter” sesame chicken, I decided to simply saute some chicken breasts and then serve them with a healthier sauce that has been sweetened with honey.  And then instead of brown or white rice, I served it over some yummy quinoa.
And people!!!  The result was so good!
Everyone is entitled to their own opinions, but I have to say that I think I loved this one even more than the original.  It was full of flavor, simple to make, not overly sweet, and definitely not deep-fried.  I would probably typically throw in a few more veggies into the saute, but for a classic sesame chicken recipe, I just served this with some fresh green onions from my CSA.
Definitely a dish I can feel much better about enjoying…and even having seconds.  ;)
Hope you all enjoy it!
Lighter Sesame Chicken with Quinoa | gimmesomeoven.com

YIELD: 2-4 SERVINGS

SESAME CHICKEN WITH QUINOA


Traditional sesame chicken goes lighter with this simple saute, and is served over flavorful quinoa.

PREP:  5 MINS COOK:  10 MINS TOTAL:  15 MINS

INGREDIENTS:


  • 2 boneless, skinless chicken breasts, cut into 1-inch pieces
  • salt and pepper
  • 1 Tbsp. olive oil
  • 3 Tbsp. reduced-sodium soy sauce
  • 2 Tbsp. rice wine vinegar
  • 2 Tbsp. honey
  • 1 garlic clove, minced
  • 1/2 tsp. ground ginger
  • 1 tsp. cornstarch
  • 1/2 cup thinly sliced green onions
  • 2 tsp. sesame oil
  • 1 tsp. toasted sesame seeds

QUINOA INGREDIENTS:

  • 1 cup dry quinoa
  • 2 cups chicken broth

DIRECTIONS:


TO MAKE THE LIGHTER SESAME CHICKEN:

Season chicken breasts generously on both sides with salt and pepper.
Heat oil in a large saute pan over medium-high heat. Add chicken and saute for about 4-6 minutes, stirring occasionally, until the chicken is cooked through.
While chicken is cooking, whisk together the soy sauce, rice wine vinegar, honey, garlic, ginger, and cornstarch until combined. When the chicken is cooked through, add the green onions and soy sauce mixture to the pan and stir immediately to coat the chicken. The sauce will thicken quickly. Stir in sesame oil, then remove from heat and serve over cooked quinoa (instructions below), sprinkled with sesame seeds.

FRIED RICE

The BEST Fried Rice -- better than the restaurant version, and quick and easy to make homemade too! | gimmesomeoven.com
Learn how to make fried rice with this fabulous classic fried rice recipe. Feel free to add in chicken, pork, shrimp, veggies, or any other proteins you like as well.You guys.
Pretty sure I had a jump-up-and-down, shout-for-joy, high-five-my-dog, ballet-leap-across-the-floor, I-am-Fried-Rice-Maker-hear-me-ROAR moment in my kitchen yesterday when I tasted this recipe.  After about 15 years of trying, I finally found a fried rice recipe that met my standards.  And I am positively giddy.
Ok, but let me back up.
You all have heard me wax poetic about my obsession love of egg drop soup, and how I ordered it every single Saturday of my childhood at our family’s favorite neighborhood Chinese restaurant.  Well, what does a picky eater order to go with her egg drop soup for said Saturdays upon Saturdays of childhood?  Fried rice, of course.  In later years, I became obsessed specifically with pork fried rice.  But for those first 12 years of life, it was “a side of plain fried rice, please” for me.
So much fried rice!
I feel like it’s critical to note, though, that the fried rice of my childhood was not that lame, bland, so-not-worth-the-carbs, lame excuse for fried rice that seems to be all too prevalent in take out joints around the world.  Quite the contrary.  This was flavorful, fresh, chewy, perfectly-fried, not-too-greasy, enjoy-it-to-the-last-bite spectacular fried rice.  And it set the bar for fried rice for the rest of my life.
Sadly, this sweet little family-owned restaurant was pushed out of business by a terrible mega-buffet that opened across the street.  (A total tragedy.)  So for the past decade or so, I have been working to try and recreate the delicious fried rice of my childhood.  I started experimenting in college, and have come close enough a handful of times for the fried rice to be passable, but it was never quite “there”.
Until yesterday.
I have to admit.  I was craving fried rice so badly that I finally sat down and did some old fashioned research on the new fashioned Internets.  And many articles and three test batches later, I finally nailed it.  And then jumped for joy and promptly ate way too much fried rice with serious joy.
In my world, this is a Big Deal.  In yours?  Eh, maybe?  Either way, it’s a fabulous 15-minute meal and can be a base for any other kind of fried rice you might enjoy.  So let me tell you what I learned…

How To Make Fried Rice | gimmesomeoven.com
Ok, let’s cut right to it.  Here are the important things I have learned over the years (and yesterday!) about making excellent fried rice.
1) Use cold rice: The key to great fried rice is using cold (or even leftover) rice.  There’s something about the cold rice hitting a hot pan that makes all the difference.  So even if you make a batch of rice just for this recipe, spread it out on a baking sheet or some large surface and pop it in the fridge (or freezer) for about 10-15 minutes beforehand so that it is not warm.  You don’t want it to be frozen, you want chilled.  (I also prefer short-grain rice, but that’s a preference — I like mine a little chewy!)
2) Use butter: Yes, butter.  I have made many a batch of fried rice using various oils, and I’m now convinced there’s a reason why Japanese steak houses use that big ol’ slab of butter when they’re making fried rice.  It just tastes better, and makes everything brown up perfectly.  (Although don’t be scared — we only use 3 tablespoons for a very large batch of rice!)
3) Use veggies: This is one of my big pet peeves with lame take-out fried rice — not enough veggies!  In addition to adding some nice spots of color, veggies go a long way in adding some flavor and freshness to fried rice.  Our local chinese restaurant always added both white and green onions, too, which I included in this recipe.
4)  Use sesame oil and oyster sauce: Ok, if you’re really squeamish about seafood, you can leave out the oyster sauce and your fried rice will still be great.  But this ingredient makes such a difference in good fried rice, and a little goes a long way.  Sesame oil, on the other hand, is 100% non-negotiable.  It is my favorite smelling ingredient in my kitchen, and tastes even better.  There as well, a little goes a long way.  (And it is meant as a finishing oil, not a cooking oil, so remove the pan from the heat once you’ve added it.)
5) Take time to actually FRY the rice: A.k.a. — take time to let it actually cook for awhile and brown a bit in the pan.  So many fried rice recipes have you just stir in the rice and (voila!) you’re done.  But I’ve found that actually sauteing the rice for a little while with the veggies helps to get that classic “fried” flavor and pulls all of the ingredients together.
How To Make Fried Rice | gimmesomeoven.com
None of these points are rocket science.  But man, do they make a difference when it comes to restaurant-style (or better than restaurant-style!) fried rice.
Alright, here’s the official how-to:
How To Make Fried Rice | gimmesomeoven.com
Ok, I forgot to take a photo of the first step: the eggs.  Scramble/fry the eggs in a bit of butter.
Then saute some onions, carrots, peas and garlic in a little more butter.  (Don’t freak out, we’re only up to 1.5 tablespoons at this point.)
How To Make Fried Rice | gimmesomeoven.com
Once your veggies are nice and cooked, add the rice, soy sauce, and oyster sauce (if using).  Again, chilled rice is key here.  Stir it in with the veggies until it is combined.  Then continue to saute it over high heat for an additional 3 minutes or so until you notice the rice starting to brown just a tiny bit.
How To Make Fried Rice | gimmesomeoven.com
Once the rice has been fried, stir in your green onions and sesame oil, along with the scrambled eggs.  And then give it a taste, and add any additional pepper or soy sauce if needed.
How To Make Fried Rice | gimmesomeoven.com
Again, if you are a chicken fried rice fan…or pork fried rice…or shrimp fried rice…feel totally free to saute up your protein in advance and add it back in at this point.  But I will tell you that — hi-ho-the-dairy-o — this plain rice can definitely stand alone too.
Oh yeah, and did I mention it only takes 15 minutes to make?  Take out, shmake out.  This recipe will be ready to go in no time.  Enjoy!!!
How To Make Fried Rice | gimmesomeoven.com

YIELD: ABOUT 4 SERVINGS

FRIED RICE


Learn how to make fried rice with this classic fried rice recipe. It tastes even better than the restaurant version!

PREP:  5 MINS COOK:  10 MINS TOTAL:  15 MINS

INGREDIENTS:


  • 3 Tbsp. butter, pided
  • 2 eggs, whisked
  • 2 medium carrots, peeled and diced
  • 1 small white onion, diced
  • 1/2 cup frozen peas
  • 3 cloves garlic, minced
  • salt and pepper
  • 4 cups cooked and chilled rice (I prefer short-grain white rice)
  • 3 green onions, thinly sliced
  • 3-4 Tbsp. soy sauce, or more to taste
  • 2 tsp. oyster sauce (optional)
  • 1/2 tsp. toasted sesame oil

DIRECTIONS:


Heat 1/2 tablespoon of butter in a large skillet over medium-high heat until melted. Add egg, and cook until scrambled, stirring occasionally. Remove egg, and transfer to a separate plate.
Add an additional 1 tablespoon butter to the pan and heat until melted. Add carrots, onion, peas and garlic, and season with a generous pinch of salt and pepper. Saute for about 5 minutes or until the onion and carrots are soft. Increase heat to high, add in the remaining 1 1/2 tablespoons of butter, and stir until melted. Immediately add the rice, green onions, soy sauce and oyster sauce (if using), and stir until combined. Continue stirring for an additional 3 minutes to fry the rice. Then add in the eggs and stir to combine. Add the sesame oil, stir to combine, and remove from heat.

Gooey and Cheesy Warm Bacon Dip

Gooey and Cheesy Warm Bacon Dip - Comes together in less than 30 minutes and is the perfect crowd-pleasing appetizer!
I made this Gooey and Cheesy Warm Bacon Dip last Sunday while we were watching the Chiefs play Miami.  Dip + Sunday afternoon football is a must, yes? ;-)
When I asked the Tall Boy what I should call this dip, his answer {as his mouth was stuffed full} was, “Mmmmmm…BACON.”
I can’t say that I blame him.  Bacon is pretty much the bomb on its own.  But paired with cream cheese, cheddar cheese and sour cream and then slathered on French bread slices — well, it just doesn’t get much better.
This Gooey and Cheesy Warm Bacon Dip comes together in less than 30 minutes and is the perfect crowd-pleasing appetizer!
I love game-watching foods that don’t take much time to put together.  As much of a girlie-girl as I am, I’m also an absolute football nut.  So I don’t want to spend my time in the kitchen preparing food when I could be in front of the television cheering on my team.
All you need for this easy, warm, ooey gooey and cheesy warm bacon dip are a few simple ingredients – and you probably have most of ‘em in your kitchen now: cream cheese, sour cream, cheddar cheese, bacon(!!), and green onions.
Just mix those bad boys together, pop everything in a baking dish in the oven, and in 30 minutes, you’ll have a crowd-pleasing appetizer that will be gobbled up in no time.
This Gooey and Cheesy Warm Bacon Dip comes together in less than 30 minutes and is the perfect crowd-pleasing appetizer!
What’s your favorite game-watching food?
Gooey and Cheesy Warm Bacon Dip
 

Ingredients
  • 8 ounces cream cheese, softened
  • 2 cups sour cream (I used light)
  • 1½ cups shredded cheddar cheese
  • 6 slices bacon, cooked and crumbled
  • ½ cup sliced green onion
Print a Coupon for Fortify™ Probiotics
 Instructions
  1. Preheat oven to 400 F.
  2. Combine softened cream cheese, sour cream, cheddar cheese, bacon and green onion. Spoon mixture into a 1-quart baking dish and bake for 25-30 minutes, or until cheese is bubbling and hot.
  3. Serve with bread slices, crackers, or veggies.

Cheesecake Factory Avocado Egg Rolls

Cheesecake Factory Avocado Egg Rolls - It's so much cheaper to make right at home and it tastes a million times better too!
We don’t eat out at Cheesecake Factory very often but when we make a visit there once in a blue moon for a big family gathering or celebration, these avocado egg rolls are always a must. And when the plate hits the table, we’re all fighting for the last one. Except, no one wants to be the person to actually grab the last egg roll. We all say, “Oh no, it’s all yours,” but we secretly want it all for ourselves.

Or is that just me?
Now if you are one of those peoples, then have no fear – here’s a homemade version that you can make right in the comfort of your own kitchen. And you can grab that last egg roll guilt free! Just be sure to keep an extra stash somewhere in the kitchen where no one else can find it.
Cheesecake Factory Avocado Egg Rolls - It's so much cheaper to make right at home and it tastes a million times better too!

But the best part about this recipe is not only does it taste a million times better than the restaurant version but it’s also unbelievably easy to make and so much cheaper to make right at home. Simply combine your avocado mixture, which is very close to guacamole, throw them in an egg roll wrapper and then into the skillet until they’re wonderfully crisp and golden brown.
Done and done.
These came together in just 20 minutes, and we devoured them in less than 5. It was so good, we made them again the very next day! And I’m sure they’ll be back on the menu this week. But I may just have to make them when Jason isn’t home because I am in no mood to share these.
CHEESECAKE FACTORY AVOCADO EGG ROLLS


Prep Time15 minutes
Cook Time5 minutes
Total Time20 minutes


Yield8 egg rolls
Just like the restaurant-version, except it's so much cheaper to make right at home and it tastes a million times better too!


INGREDIENTS
  • 1 cup vegetable oil
  • 3 avocados, halved, peeled and seeded
  • 1 roma tomato, diced
  • 1/4 cup diced red onion
  • 2 tablespoons chopped fresh cilantro leaves
  • Juice of 1 lime
  • Kosher salt and freshly ground black pepper, to taste
  • 8 egg roll wrappers
  • FOR THE CILANTRO DIPPING SAUCE
  • 3/4 cup fresh cilantro leaves, loosely packed
  • 1/3 cup sour cream
  • 1 jalapeno, seeded and deveined, optional
  • 2 tablespoons mayonnaise
  • 1 clove garlic
  • Juice of 1 lime
  • Kosher salt and freshly ground black pepper, to taste
INSTRUCTIONS
  • To make the cilantro dipping sauce, combine cilantro, sour cream, jalapeno, mayonnaise, garlic and lime juice in the bowl of a food processor; season with salt and pepper to taste. Set aside.
  • Heat vegetable oil in a large skillet or Dutch oven over medium high heat.
  • In a medium bowl, gently mash avocados using a potato masher. Add tomato, red onion, cilantro, lime juice, salt and pepper, to taste, and gently toss to combine.
  • Working one at a time, place avocado mixture in the center of each wrapper. Bring the bottom edge of the wrapper tightly over the filling, folding in the sides. Continue rolling until the top of the wrapper is reached. Using your finger, rub the edges of the wrapper with water, pressing to seal. Repeat with remaining wrappers and avocado mixture.
  • Working in batches, add egg rolls to the Dutch oven and fry until evenly golden brown and crispy, about 2-3 minutes. Transfer to a paper towel-lined plate.
  • Serve immediately with cilantro dipping sauce.

Avocado Quesadillas (vegan)


I can't believe there was a time when I didn't like avocados. I'm sorry I ever doubted your awesomeness you creamy, luscious, little fellas! One thing's for sure: we've got some making up to do for all that lost time. Like with these quesadillas I've been stuffing in my face on the daily. Quesadillas have always been a quick go-to meal for us, but when I stopped eating cheese, well... so went the quesadillas. I desperately wanted them back in my life and although an obvious substitution would be non-dairy cheese, this seemed like a job for avocados! Let me tell you... these babies are for REALS. I love that they're healthier than cheese quesadillas, and I think they taste even better. My husband and I make them all the time, and there are so many variations you can try. Or you can just replace cheese with avocado in any of your favorite quesadillas. We don't even bother cutting them anymore -  we just hold and eat 'em as one big 'dilluh. Napoleon would be proud ;)


Vegan, gluten-free (with gf tortillas)

Ingredients
1/2 avocado, more if you prefer
1 small roma tomato, diced
1 green onion, sliced
2 tsp. nutritional yeast
Seasonings of choice (I love smoked paprika, cumin, garlic powder, etc.)
Salsa (optional)
1 large tortilla

Directions
Smash avocado and spread out on one half of the tortilla. Sprinkle with nutritional yeast and any seasonings. Add tomato, green onions, and salsa. (Or save the salsa for dipping!)
Fold over the top half of the tortilla, and place on a skillet over medium heat.
Heat for a few minutes on each side until warmed through.

*Note: I love salsa in the quesadilla, but it does make it a little messier. Oftentimes I leave it out and just dip it instead.

{Printer Friendly Version}


More avocado! Num num...
Quinoa Avocado Spinach Power Salad
Chickpea Avocado Mash with Lemon
Creamy Avocado Lemon Basil Dressing & Dip
Vegan Fudgesicles (yes fudgesicles!)
White Bean Spinach Enchiladas with Avocado-Cilantro Sauce

Heart-shaped Rice Krispie Treat Pops

I love delighting my children with special seasonal treats. These Heart-shaped Rice Krispie Treat Pops took less than an hour to prepare. It’s a perfect and fun recipe for a busy mom like you! I had them wrapped and ready for school lunch boxes in fifteen minutes!
heart shaped rice krispie treats
Kids love these treats — get ready to see some smiles! Want to add some fun and giggles to your next Valentine’s party? Bring these easy treat pops along! These also make cute teacher gifts. Don’t forget your neighbors — they’ll love them too!  If your school or group permits homemade treats, I highly recommend using more than one heart-shaped cookie cutter — trust me on this one!
easy rice krispie heart pops
Print a Coupon for Fortify™ Probiotics
I made a total of 5 batches — purple, green, pink, orange, and yellow — all the colors of Valentine’s conversation hearts! To add an extra touch of fun, you can pipe some messages onto the hearts!
easy heart-shaped rice krispie treat pops
To make these colorful treats gift friendly, wrap them in a plastic bag fitted with white jute twine. You can now take them to a bake-sale. These are also perfect for a sweet Valentine or party favor. So many possibilities!
rice 

krispie treat hearts pops
How Can Your Kids Help?
Kids will love buttering up their clean hands and pressing the warm Rice Krispie mixtures into the cookie cutters. Watch their amazement as a heart-shaped Rice Krispies Treat pops out! Kids can also help drizzle icing and sprinkle sugar crystals over each heart.
easy heart-shaped rice krispie pops
What kind of special Valentine’s Day treats do you make?
easy heart-shaped rice krispie treat pops
Want to make your own? Here’s what to do!
easy heart shaped pops

Easy Rice Krispie Heart Treats

Materials needed:
Directions:
1. Melt ½ tbsp butter with 2 drops of food dye. Fold in 1 cup of mini marshmallows until they are completely melted. Add one cup of rice krispies
and stir until mixed well and all the cereal is completely coated.
2. Butter your hands and the cookie cutter.
3. Gently press a scoop of Rice Krispies mixture into the cookie cutter. Next, push it out onto the parchment paper. You should now have 1 rice Krispie.
4. Repeat for remaining treats and let treats cool completely. Each batch makes 3 Rice Krispies Hearts.
5. Once treats are cooled, press lollipop sticks into the bottom of each treat.
For the icing:
Mix 1½ cups of powdered sugar with 2 tbsp of milk . Drizzle icing over treats. I scooped the icing into a frosting bag fitted with a #2 tip then drizzled it over the treats.
Optional: Sprinkle rainbow sugar crystals over the fresh icing.
Enjoy and share your treats with friends and family!