Up until a few months ago I was going through box after box of Nature Valley granola bars. They are my favorite, crunchy and sweet, and not fake tasting like so many granola bars out there. Looking at the ingredients list didn't make me feel too bad. Although they are loaded with sugar, they contain mostly natural ingredients which is nice to see. However, it was my goal to make a homemade version that could compete with the crunchy goodness of the store bought kind. Over several months time I tried several granola bar recipes, but none of them would turn out how I wanted them to. They would either fall apart and turn into granola instead of a granola bar, or they were so hard I could hardly cut them, much less take a bite. These attempts were often not the best tasting either. Finally however, I found a recipe that looked promising. It originally came from America's Test Kitchen which made me even more excited. Their recipes almost always turn out great. These granola bars were no exception. They are crunchy and sweet, strong enough to hold up in my lunch box, but not so hard that they break a tooth. They are exactly what I was looking for.

It's a simple recipe that uses ingredients I almost always have on hand. To ensure that these bars are super crunchy, the recipe calls for toasting the oats with oil before forming the bars. I think this is the key step. One of the most difficult parts about making homemade granola bars is cooking them enough so that they get dried out all the way through, but not so long that they start over cooking. Toasting the oats first means that the bars start out dry and crispy, so they don't need to cook as long and start overcooking.
After toasting the oats, all you have to do is pour the liquid ingredients over them, mix it up, and press it in a lined pan. Press down to squish all of the granola together into an even layer, and bake. Nothing to it. I like these bars the best with almonds, but when I made my last batch I was out of almonds, so I just added an extra cup of oats and they turned out just fine. So if you don't have any nuts around, or don't like nuts, just leave them out!
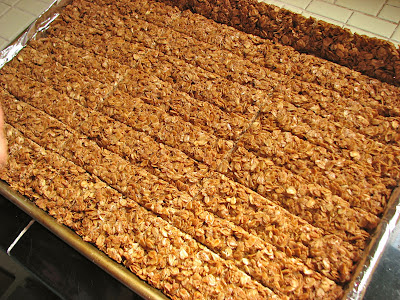
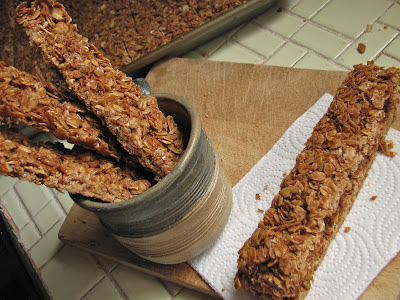
Another key step to making the perfect granola bars is cutting them while they are still warm from the oven, before they harden up and become impossible to cut nicely. I have found that letting the pan rest for 10 minutes works best for me. After these 10 minutes I grab my trusty pastry scraper and cut up the bars (I like cutting the pan into 45 bars, 9X5). Then just let them cool the rest of the way and you have the perfect granola bar.
To be honest, while these bars are delicious, they do not taste like the Nature Valley crunchy granola bars. I still love my Oats and Honey granola bars, but they will definitely just be for emergencies from now on!

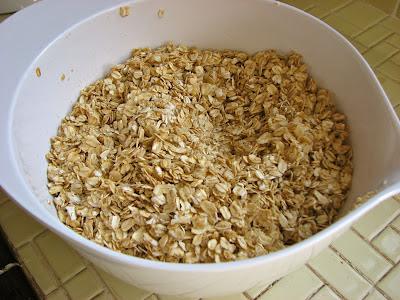
Grab your oats
Add the oil and salt and mix to combine

Toast them on a cookie sheet until golden brown
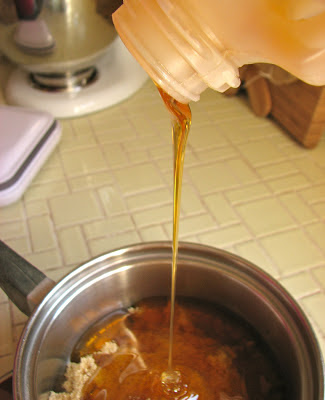
Meanwhile, grab some honey
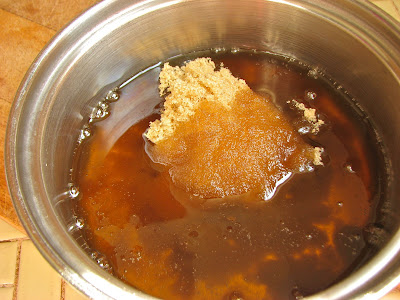
and combine it with the brown sugar

Cook over medium heat until sugar dissolves

Add the cinnamon (if using)
and the vanilla

Pour the liquid mixture over the oats,
if using nuts add them here as well

Spread the granola on a greased, foil lined sheet pan
and use a spatula to press into a tight, even layer

Bake!

Let the granola cool for about 10 minutes and then
cut them up into bars
(don't wait any longer than 15 minutes to cut or it
will be too hard)
Once cut, let them cool the rest of the way

Break up the bars
Enjoy as many ways as possible!
Crunchy Granola Bars
Adapted from Bakerlady, originally from America's Test Kitchen
Ingredients
- 7 cups old-fashioned rolled oats
- 1/2 cup vegetable oil
- 1 teaspoon salt
- 1 1/2 cups whole almonds, pecans, walnuts or peanuts
- 3/4 cup honey
- 3/4 cup packed brown sugar
- 1 Tablespoon vanilla extract
- 2 teaspoons ground cinnamon (optional)
Directions
Adjust oven rack to the middle of the oven and set the temperature to 375 degrees.
Line an 18 x 13 inch rimmed baking pan with aluminum foil.
Combine the oats, oil and salt in a large bowl and mix until the oats are evenly coated. Transfer the mixture to the baking sheet and spread into an even layer. Bake, stirring every 10 minutes, until pale gold, 20-25 minutes. Remove the oats and lower the oven temp to 300 degrees.
Place the nuts in a food processor and process until coarsely chopped. Or just chop coarsely with a big sharp knife.
Combine the honey and brown sugar in a saucepan and cook over medium heat for about 5 minutes, stirring constantly, to dissolve the sugar. Remove from heat and stir in the vanilla and cinnamon (if using).
Combine the oats, nuts, and honey mixture in a large bowl and stir with a large rubber spatula until the oats are thoroughly coated with the honey mixture. Spray the baking sheet (still with foil sling) with non-stick spray then transfer the granola mixture to the prepared baking sheet and spread in an even layer. Spray a large metal spatula or a square dish with non-stick spray and firmly press the mixture into the pan. Make a flat, tight, and even layer. Bake until golden, about 35-40 minutes.
Cool in the baking sheet, on a wire rack, for 10-15 minutes before cutting into bars, I used a pastry scraper to cut. Cut the bars all the way through and then allow the granola bars to completely cool. Do not wait longer than 15 minutes before cutting the bars. They harden up significantly as they cool. Any longer and you’ll have a very hard time cutting thru them.
The bars can be stored, covered for up to 2 weeks.

I too have tried different granola bar recipes and have come across the same problem...they fall apart no matter how long I let them sit....they generally become granola in a bag.
ReplyDeleteI made these yesterday exactly as written and they turned out great! I let them cool over two hours and they cut perfectly. I think maybe the secret is to just walk away and forget them for a few hours��. My picky husband loved them and took a few to work to share with his coworkers. Thank you so much for a great recipe!
ReplyDeleteMary, Savannah GA
Why line the pan with foil?
ReplyDeleteCan you replace vegetable oil with coconut oil or grapeseed oil?
ReplyDeleteI made these yesterday and noticed that they became very crumbly once I added in the nuts. I drizzled in more honey a tablespoon at a time until it matched the consistency that it was before I added the nuts. They came out great after that. They definitely need to be cut no more than 15 minutes after they're out of the oven as they go very hard.
ReplyDeleteI just made half a batch of it and most of it fell apart and crumbled (there are some chunks if you’re very careful). I used coconut oil and the only thing I did differently than the recipe said was using baking paper instead of foil. The flavour is nice and my 2 year old loves it, so I suppose we’ve got a baked muesli now instead of Müsli bars.
ReplyDelete